Pattern Making- The Late Bustle Era Bodice

Adjusting the Armscye

Sometimes- especially with those ladies with larger differences between waist and bust measurements, it will be essential to adjust the armscye length.

Compare the armscye measurement you took during the measurement process to the armscye measurement of your basic sloper. If it is between 1-2.5 inches some adjustments will likely need to be made. (If it is larger than 3" you may need to slope the shoulder seams down as well.) The same is true if you normally wear a size C-D cup bra or larger. As a general rule the bigger the dart the more fullness allowed (usually people think of the opposite being true).

Since it is NOT appropriate in this era to take a dart that fits in from the armhole, we will need to adjust the pattern to allow for the extra fullness. This is actually fairly easy to accomplish by a slash and rotate method. This will give you the "French dart", referred to in
lesson 1.


1. Cut out your tracing of the front.

2. Mark a straight line from the top of the outside bust dart point to the bottom center of the bust dart point extending to the edge of the bodice piece. This should pass directly through the center of this dart.

3. Mark a straight line from the top of the outside bust dart point to the armscye at approximately the point where it curves deepest to the front.
4. Slash the pattern along these lines to leaving just about 1/8" at the top point of this dart. Just enough to leave both pieces of the pattern hanging together.

5. Rotate the pattern upward, forming an overlap at the armscye and spreading the pattern apart at the bottom. I recommend about 3/8" spread at the waist for each cup size starting at C. You may also gauge how much you need to spread by the difference in armscye measures. Take the difference in the armscye measures minus 1/2 inch and divide it by 2. That will give you the amount to overlap the pattern at the armscye.

6. Tape the overlap in place at the armscye, and add a piece of paper underneath the now open dart, and tape in place.

7. At the waistline mark the center of the dart. Draw a line from the top point of the dart through the center to the hipline. Notice that this changes the shape of the dart to be open ended instead of coming to a point at both ends.

8. Connect the ends of the dart and "round out" the armhole again. (It may need trimming or a new line drawn just out from the previous lines, but should be smoothly rounded.)

9. Retrace the adjusted bodice on a larger sheet of paper, making note of waistline, darts, and markings.
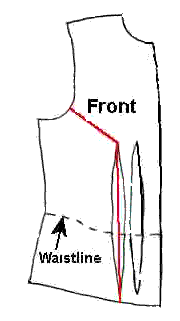
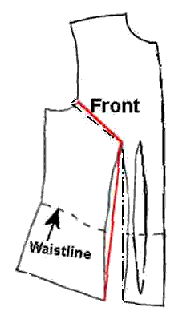
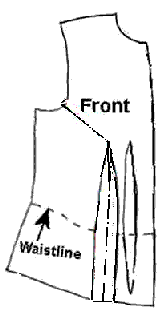
If you have been looking through patterns from the period you will likely notice several of them have a one larger dart. Darts made in this method leave more fullness or roundness to the bust area. When observing period pattern shapes you will notice they are usually made to an "ideal, corseted" shape, or the hourglass figure and will look something like this adjusted shape- side seam sloping outward with the outside 
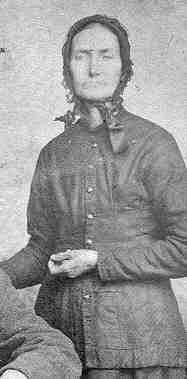
dart wider than the inside. You will also notice in some photos ladies who were straighter up and down often had an unsightly vertical wrinkles at the bustline. This is often caused by this dart being too large.

Lesson 2 - Page 9
Site Index
Page
1- 2 - 3 - 4 - 5 - 6 - 7 - 8 - 9 - 10


Copyright 2001 by Marna Jean Davis. All contents of the websites associated with the lessons of Marna Jean Davis and Shooting Star Enterprises are protected by U.S. copyright laws. They may be printed out by registered students for their own personal use but may not be reprinted in any other manner or reproduced in any form.

Costume Classroom is a division of
The Costume Gallery, copyright 1997-2001.

Having problems with this webpage contact: questions@costumeclassroom.com