|
Drafting the pattern can be a bit easier if you have your materials ready. Get out your
tape measure, square, French curve or styling design ruler, and a couple of sharp pencils. You will also want your
measurement chart and pages 25-26 of your manual handy. (A calculator is also a plus!)
You should also have decided on the general time frame for your bodice. (If you need some help narrowing this down
post a message on the board or e-mail me.)
Read through Making your sloper- If you like you can fill in many of the blanks with your own measurements. We
will be going a bit "out of order" compared to the booklet, but I wanted to try to show the formation
of the basic frame.
Some information you will need:
When I say Back length= A to B, that means draw a line from point A to point B as shown in
the drawing equal to your back length measure. This
will be the same principle for transposing all of your measurements to the pattern. (ie. Bust measure divided by
2= A to C,underarm to waist=I to K
Squaring a line-
Using the short edge of your square, carefully line it up with the previously drawn line,
with the corner of the square at the point you are squaring out from. Draw a line perpendicular to the original
line along the edge of the square. It is important that the basic frame remains in a square or rectangular form.
This is why you will need a good square. If you do not square up your lines then the pattern can become "stretched"
out of shape, and will not fit as well.
Your paper you will be drafting on will need to be a rectangle about 12-15 inches bigger
on each side than approximately half of your bust measurement by your back length. I prefer to draft my original
on heavy poster paper- preferrably white- because it is easier to see the lines when tracing the individual pieces
of the bodice sloper later.
Using the drafting curve/styling design ruler- depending on your size, you will need to use different points on
the curve to draw in you lines.- use the pictures as a guide- noting where the lines are straighter or more curved.
I will try to note a range of starting points by the inch markings if you are using the Dritz Styling Design Ruler
in italics.
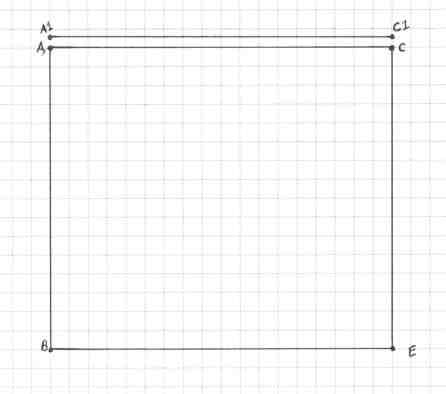
1. Back length = A to B
2. Full bust divided by 2=A to C
3. Waist divided by 2=D
Note: Line AB should be perpendicular to the bottom of the paper's edge, and point
B should be about 11 inches from the bottom of the paper, leaving point A about 1" from the top.
4. With straight edge draw vertical line AB equal to back length
5. Square over from point A to point C
6. Square down from C parallel to AB. CE = AB
7. Close the box by connecting E to B
8. Draw line parallel to AC 1/2" above it. Mark C1 and A1 directly above A and C on this line.
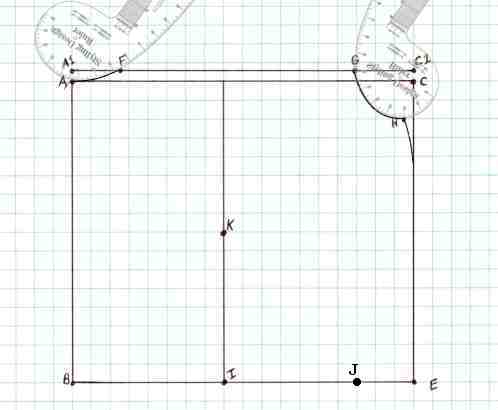
(steps 9-12 create the neckline)
9. Neck- ______ Front neck-______
10. Neck measure minus front neck divided by 2 = AF length (a curved line) Using neck curve starting point A curve
up to A1 C1 line and mark F on the where it intersects. Point F should approximately
line up between 17-18" mark on the styling design ruler- the last 1/2" before point a should be even
with the AC line.
11. Measure the distance from A1 to F and add 1/2" for average bust, or 3/4" for full bust this measure
equals the distance from point C1 to point G.
12. Front neck divided by 2 = G to H, using the curve mark the front neck. Point H will be 1/2" inside line
CE for an average bust, 3/4" inside for a full bust. Point H should approximately
line up with the 22-23" mark on the styling ruler. A
full bust is considered a C-D cup or larger in your bra size- or over a 45" bust measurement.
13. Draw a gently outward curving line from point H to line CE
14. Front bust- measured from sideseam to sideseam divide by 2=I to E
15. Square up from I through FG line
16.Bust point to Bust point divided by 2=_____=J to E
17. Underarm to waist = I to K
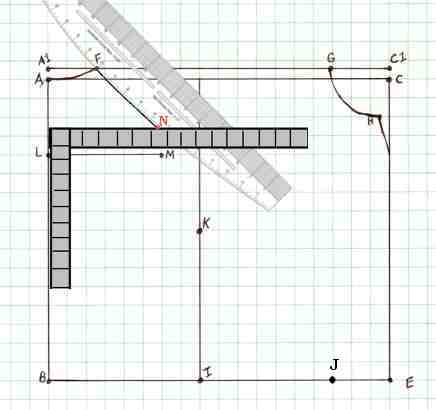
18. A to L = 4" or length of base of neck to Back width
19. Square out from L, Back width divided by 2 =____= L to M
20-21 draws the back shoulder seam
20. F to N = shoulder length. Draw with a soft down curve. Point F will intersect
with approximately the 10-11" mark on the styling design ruler.
- N should be about 1" to-1 3/4" above the LM line, and approximately 1/2 the
shoulder width over from the AB line. This can be marked easiest by using both your square and curve and sliding
them up or down until the shoulder length and the half shoulder width measure intersects.
21. O to G = shoulder length with point G being located on the AC line. Draw with a soft
up curve
Lesson 2 - Page 1
Site Index
Page 1- 2 - 3 - 4 - 5 - 6
- 7 - 8 - 9 - 10
|