![]()
Pattern Making- The Late Bustle Era Bodice
Seam placement for the Cuirass bodice
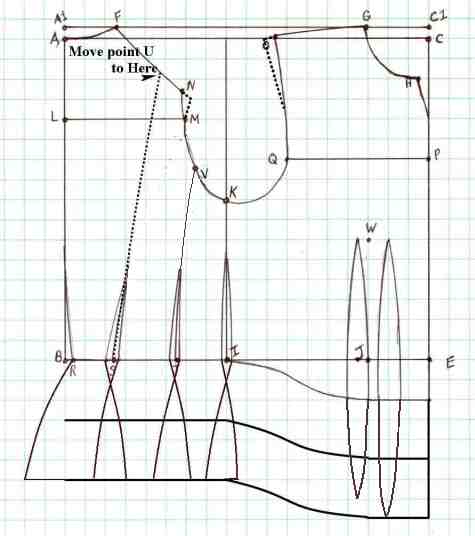
- 27. Extend shoulder lines(FN and GO) by 1/2 inch. Connect the ends of these new lines with point M and halfway between point O and Q respectively. NOTE: if you have taken the longer shoulder measurement for the late 1870's bodice when you measured- then you will not need to extend the shoulder lines- simply use the longer shoulder measurement.
- 28. U is now on the shoulder line approximately 1 to 1 1/2" from point N. B to R= Waist taper(see step 34)
- 29. R to S = 1/2 waist minus 1/2 Front Waist divided by 6
- 30. S to T = 3/5ths of S to I
- 31. Connect S to U with a barely curved line that curves toward the back (toward line AB) You will not be able to draft this line with one motion with the designers curve. It may be easiest to sketch it in lightly with a straight edge to get the general line, and then gently curve it with the long edge of your design ruler.
- 32. V to K is about 1/4 inch to 1/2 inch more than 1/3 of the distance between U and K.
- 33. Connect T to V with a soft curve
34. Bust____ minus Waist _____ =_____ divided by 2 = ______ minus dart width ____ times
2 =___ inches to be taken out of back waistline. divide by 4____= waist taper
The cuirass bodice will use the "natural" or "without bustle" hip form drafting instructions

Copyright 2001 by Marna Jean Davis. All contents of the websites
associated with the lessons of Marna Jean Davis and Shooting Star Enterprises are protected by U.S. copyright laws.
They may be printed out by registered students for their own personal use but may not be reprinted in any other
manner or reproduced in any form.
Costume Classroom is a division of The Costume Gallery, copyright 1997-2001.
Having problems with this webpage contact: questions@costumeclassroom.com