Step 1: Sew the underarm gussets to the sleeves
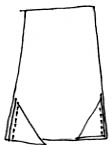
| Take one of the triangular gusset pieces. Match up one of the straight edges with the top of the sleeve, as shown to the left. Sew the two pieces together 1/2 an inch away from the edge. Repeat this on the other side of the wide end of the sleeve. Do this to both sleeves. Iron the seams open. |
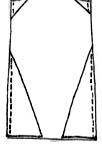 |
Starting at one end of the body, match up one of the long triangular gores with the edge of the body as shown to the right. Sew the two together half an inch away from the edge. Repeat the process on the opposite side. Then sew the other two gores at the opposite end of the long body piece. Iron all seams flat. |
You will end up with a shape like so:
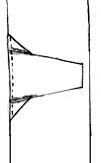
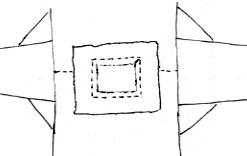 Place the square on the right side (the outer side) of the smock, locating
the neckline square so that it is centered and so that the shoulder line
on the body comes to around 2 inches inside one edge. Pin the square to
the smock along the neckline line, making sure that the two lie flat. Sew
all the way around this neckline.
Place the square on the right side (the outer side) of the smock, locating
the neckline square so that it is centered and so that the shoulder line
on the body comes to around 2 inches inside one edge. Pin the square to
the smock along the neckline line, making sure that the two lie flat. Sew
all the way around this neckline.
Cut out the center of the neckline, 1/2 an inch away from the seamline. Snip each of the corners. Then turn the remaining fabric to the inside of the smock, iron under the raw edges, and stitch down.
 |
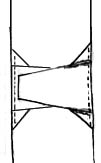
5. Sew the Smock Together Fold the smock in half lengthwise, inside out. Starting at the wrist end of one sleeve, sew the bottom edge of the sleeve together, then the triangular gussets, then the triangular gores, half an inch from the edge. Repeat on the other side. Turn it right side out, and you have a smock! Now you need to hem the bottom and the edges of the sleeves. You can also embroider around the neckline, if you wish.
|