Ruffs Cartridge-Pleated to a Band
Elizabethan Ruffs were constructed in one of two ways. In the first way, the fabric was pleated/gathered into the top edge of a collar band, which created a ruff that "hugged the face", so to speak. This type of ruff was most common from the 1550s to 1580s. In the 1580s, a new method of ruff construction became fashionable; the fabric of the ruff was cartridge-pleated and sewn to a neck band. The width of the ruff at the inner neck edge was the width of the collar band. This method allowed ruffs to become wider in diameter, creating the memorable "head-on-a-platter" effect popular in late Elizabethan England, Holland and Flanders.
Once larger ruffs became popular, "supportasses" or "underproppers" of wire or pasteboard were required to keep them standing upright.
Beginning in the 1580s and continuing on to the end of the century, women's ruffs began to be worn differently; rather than encircling the neck as they had in previous years, the front edges of the ruff were pinned to the outer edges of a low, square neckline. For simplicity's sake, these will be referred to as "open" ruffs on this page.
For more information on the history and development of ruffs, check out The History of Ruffs.
To calculate how much fabric is needed for the ruff you want to make, visit A Ruff Calculation: Calculating fabric for your ruffs.
Ruffs Cartridge-Pleated to a Band
Supportasses & Underproppers
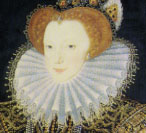
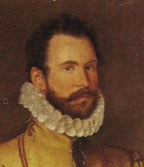
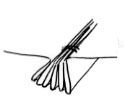
 This is a small ruff, which requires no special materials, equipment or skill to make. It ends up making a ruff about 1.5 inches in depth with ruffles about 1 inch high, that hug the neck and flare out around the face. It ends up looking exactly like the ruff pictured to the right. I like it because it not only looks wonderfully authentic, but because no elaborate shaping, starching or stiffening is needed. It's quite comfortable, doesn't get in the way, and can be easily incorporated into the top of a partlet, smock, etc. as well as worn by itself. It's a good ruff for merchant-class costume.
Materials:
Making the Ruffle
2)Using a pencil and a ruler, make marks 1/2 an inch away from one edge of the ribbon every 3/4 of an inch.
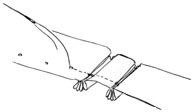
| 3) Thread a needle with a long length of thread. Bring the needle up through the first mark, catch a few threads at each of the next four marks, and draw the thread tight. You will have 5 bits of fabric on the needle, with four little gathers between them. Sew a couple of stitches through the gathering point of all 5 bits of fabric that you gathered together, locking them firmly in place. | 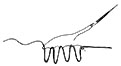 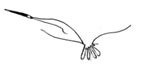 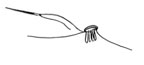 |
|
4) Do a running stitch (in-out-in-out) to the next mark on the ruff. The needle should come out of the mark on the top. Catch a few threads at each of the next four marks, gather them together, and stitch the five through a couple of times to lock them down. Then do a running stitch to the next mark. Repeat ad nauseum until the entire length of ribbon has been gathered in this manner.
|  |
| 5) Thread your needle with a new length of thread. At every gathering point, divide the four gathers so that two lay to the right and two lay to the left. Make sure that the edges of all of them are even--this is important to making an even, neat looking ruff--, and stitch them down 1/2 an inch away from the edge (where the first running stitch can be seen.) When finished, the open edge of your ruff should resemble a neat series of figure eights, when you lay it on a flat surface. | 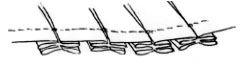 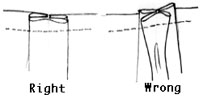 |
7) Cut two rectangles of the white fabric. Each rectangle should be 3 inches wide and the length of your neck measurement + 1 inch.
8) match up the sewn-flat edge of the ruffle with the edge of one of the rectangles of fabric. The rectangle should be 1/2 inch longer on either end than the ruffle. With the ruffle on top, sew the fabric and ruffle together 1/2 an inch away from the edge, following the line of stitching that holds the ruffle down.Now place the other rectangle on the other side of the ruffle, so that the ruffle is sandwiched between two layers of fabric. match up the edges. With the already-sewn piece of fabric on top, stitch all three layers together, following the stitching line already in place.
10) stitch the short edges of the fabric rectangles together 1/2 an inch away from the edge, being careful not to catch any ruffle material between them. Turn the ruffle right side out. You may if you wish iron the band to flatten it; be careful not to iron your ruffle, however. 11) Now turn things right side out and wrap the collar around your neck. Voila! You have a period-looking ruff. The collar can be attached to a partlet or smock, or you can finish off the bottom edge and pin it inside a smock collar, partlet collar, or high-necked doublet. If the ruffles are misshapen after their sewing ordeal, simply pulling and coaxing with your fingers should get them back into shape. You can fasten the ruff together with hooks and eyes or with two sets of laces. (I prefer hooks and eyes, as they don't come undone as quickly.
For a more authentic ruff, you can use a strip of linen fabric which has the selvedge for one side. This will look better if you iron the linen with heavy spray starch beforehand. Alternatively, you can sew a small band of lace to the outer edge of your ruff for a fancier look, or stitch soutache braid or piping in black, gold or red along the outer edge instead. For the embroiderers among you, the ribbon or strip of linen can be blackworked and decorated with spangles,. All of these decorative methods are seen in Elizabethan portraits, and all should be done before the strip or ribbon is gathered.
 To make your ruffles wider, increase the space between the marks to one inch or even more. To make them narrower, decrease it to 1/2 inch or so. To make the ruffles longer, include more gathers in each gathered section; gather six folds instead of four, as shown to the right, and stitch three folds down to each side of the gathering point rather than two.
 Naturally, if you are going to use a wider strip of fabric or ribbon to make a ruff with a greater diameter, you will have to gather more folds at each gathering point to compensate. The idea behind the method above is basically stacking box pleats on top of eachother; if you plan to make a large open ruff, you may want to stack inch to inch and a half box pleats on top of eachother rather than sewing them down, as is necessary with smaller pleats to achieve a neat and even looking ruff. (See example to the left for an idea of how the pleating is done.)Experiment with different ribbon widths, numbers of gathers and spacing between them to achieve the look you want.
This ruff can be completed, start to finish, in less than 4 hours. If you have any particular questions, please Email me
One way to get a full, fairly accurate looking lace ruff is to make it from ruffled lace to begin with. We have made ruffs with lace up to 2 inches in width using this method. (Without having a supportasse or frame) . The ruffled lace is cartridge pleated to the band of your choice, setting the pleats at 1/4" intervals. I use a 1" wide band of twill tape to pleat to, but it can be whatever you choose. Simply make marks 1/4" apart all along one side. Then on the opposite edge do the same but set the first mark to start 1/8" in from the original placement so the marks are offset. (Can be put even closer together if you want) Something like this:
'    '    '    '    '    '    '    '   Top edge
  '    '    '    '    '    '    '   '  Bottom edge.
Then you simply sew the lace on folding at each mark and sewing down twice at each fold. (Two needles required, one for each side).
Use a high quality polyester blend ruffled lace, and it holds up to many frequent washings. I do not throw them in the dryer, but they do go through the washer just fine... I air dry them on a towel so if they need any shaping or starching it can be done then.
Also, we make many different styles of ruffs... cartridge pleated theatrical styles using just horsehair for the ruff, edged with pearls or lace. Horsehair comes in a variety of widths. (We can get a ruff up to 5 inches deep this way, and from 2 feet away it looks amazingly like a fine lawn) Or fine silk batiste/organza reinforced with horsehair. Or a variety of fabrics or laces, box pleated in layers.
We have found that following only a singular way of making a ruff is unsatisfactory. Mainly because when we have an actor wishing to duplicate a specific look or style from a portrait one way does not fit all circumstances. And for most, it needs to look good for a 7 weekend run of varying weather circumstances.
These techniques have been culled from publications from Janet Arnold, Jean Hunnisett, our local "Rep", the SCA and our own yankee ingenuity. (p.s. have never tried the circular method described in "Elizabethan Costuming".)
I've tried these before with little success, because I couldn't get them to stand up properly. Most costume books will tell you that it was accomplished with a supportasse, a metal framework. Since making one was beyond my skills, I was never able to resolve the problem untiI did more research and found another period solution.
Go to a library (sorry, there isn't a clear picture on the Web) and look at Peter Paul Ruben's Medici Cycle. The ladies in the remarriage scene are wearing these ruffs, and they are supported simply by wearing a conventionally pleated ruff underneath them. This is what I did, and it works well.
I used 2 1/2 yards of vintage crocheted lace, with a pronounced scallop. Crochet is of course not period, but the pattern on this lace closely mimics bobbin lace and looks quite good. My lace was actually a 2" insertion strip with a matching 2" edging, I stitched them edge to edge as would have been done in period to get a 4" lace.
Since I can't find good starch, I stiffened the lace by soaking it in a 1:1 solution if Elmer's glue and water, then squeezed out the excess and hung it on a clothesline to dry. By carefully stretching and smoothing it on the line when it was almost dry, I got it good and smooth.
Then I sewed the lace to a 2" strip of organza fabric, which I gathered and sewed into a 2" stand collar, which was then sewed to a partlet. I was able to form the pleats into shallow curves by hand, as the glued lace is stiff yet somewhat malleable.
I made another, tightly pleated ruff of stiff synthetic lace, further stiffened with fishing line sewn along the edge. I tacked it to the collar underneath the standing ruff.
When worn, the partlet is tucked into the gown neckline. The front corners of the upper ruff are pulled down and pinned to the edge of the neckline. The whole project took under 8 hours and looks fabulous! I'm so happy!
Place the Ruff on the top and pin into place intermittently on the supportasse, and lastly on the neckline itself. When deciding the measurements of the supportasse, ensure that it is exactly the same as the ruff but ends slightly shorter where the open ends of the ruff end up, so the supportasse does not show, or reduce it by 2" less that the ruff to be used. A lace edge can be added as long as it doesn't extend too far beyond the ruff edge, or a fine wire edge can be used, by forming gold picture wire into continuous triangular shapes, and sewing to the edge of the completed supportasse. You could even sew pearl or crystal drops to loops made with twisting the wire into shape. Very pretty. If one feels adventurous, the wire edging can be extended to be the whole supportaasse, by making ever increasing triangles of twisted wire on a base collar and in a semicircle. Hope this helps - remember with the latter, a lot of wire would be needed, and can be silver, gold or copper in colour!
Authenticity was not my first priority when making this one; ease of construction was. So I ended up using that polyester "ruffle" stuff-it's about 2 inches wide with fishing-wire type stuff sewn into the outer edge and the inner edge slightly gathered to a small band. It looks like the stuff that goes on the edge of a clown outfit. I bought 8 yards of this and 9 yards of white, 3/4 inch-wide bobbin lace to edge it with.
The first part was easy-I sat down at the sewing machine and stitched the bobbin lace to the outer edge of the white ruffly material, covering up the topstitched hem and helping to stiffen the edge.
Then I made a linen neckband-1 inch wide and big enough to fit comfortably around my neck. I basically folded over a rectangle of linen, sewed one short side and the two long edges together, turned it right side out, and voila.
I marked out dots with a vanishing fabric pen every 1/4 inch at the bottom edge of the neckband. I did the same along the top edge, but I started 1/8 an inch away from the end so that the dots on the top edge and bottom edge were staggered. If you connected a top dot to a bottom dot and went back to the top and then to the bottom, you'd get a very narrow zig-zag.
Using the same pen, I marked dots along the gathered edge of the ruffle at 1-inch intervals.
Then I threaded two needles with strong white thread. I folded 1 raw end of the ruffle under, and stitched the gathered edge to the bottom edge of the band, matching the first dot on the ruffle to the first dot on the band.
Using the other needle, I stitched the ruffle fabric to the top of the band, matching the next dot on the ruffle to the first dot on the top edge of the neckband. I then brought the fabric back across and stitched the ruffle to the bottom edge of the band with the bottom edge needle, matching dots. I continued this zig-zag stitching,sewing the ruffle to the top edge, then the bottom edge, then the top edge again, until I came to the end of the neckband. I had just a little bit of fabric left. I cut the ruffle off half an inch after the last dot, folded it under, and stitched it to the very end of the band.
I now had a ruff, albeit an exceedingly messy and uneven one. I then took some stiffening stuff-it's used for stiffening crochet, and is available at Ben Franklin's, some Jo-Anns, and other craft and fabric stores-and diluted it half and half with water in a big bowl. I dunked the ruff in, massaged it around, and let it sit for a couple of hours. Then I took it out and set it on a flat surface (covered with saran wrap), and began to arrange and even out all of the ruffles so that they were the same height and size. It took a while, but I finally finished-and let it sit for two days.
After it had thoroughly dried, I picked it up and tried it on. Voila! A perfectly even ruff! It stuck straight out, when I tried it on by itself; when I put a high-collared doublet on over it, however, it pushed it up around my face like the ruffs you see in period in the later 1560s.
Things I will do different next time:
After working with ruffs for many years I discovered that the only difference between the two styles is the starch. About 95% of the ruffs that I have seen in portraits are done this way - to tell what you are looking at examine the appearance of the outer edge, the body of the ruff (between the edge and the neckband) and how the ruff goes into the neckband (if visible). For a cartridge pleated ruff, the outer edge will look like a zig-zag, the body will be made of many narrow, crisp pleat edges, and the entire edge of the ruff fabric will lie (vertically) flat against the neck. (I hope that makes sense, it's easier with pictures).
The remainder of the ruffs will have either the soft bunches of horizontal pleats or perfect circles or figure 8's, the body of the ruff will be wider, flatish tubes, and the ruff will be sewn flat onto one edge of the collar. The most famous (and visible) example of the last part is in any portrait of Mary, Queen of Scots because she was famous for wearing her ruffs open. If you look closely you will notice that the ruff is sewn into the top edge of the neckband of her partlet, and then the ruff "spreads" open from that flat point to form perfect figure 8's.
This style of ruff has many advantages, in addition to being more historically accurate. Because it only attaches to one edge of the neckband, the neckband can be worn inside the neck of your partlet or high necked dress or doublet - this has two advantages, first, if you pin your ruff in place (or use snaps or whatever) as period folks did, you can open up your collar on hot days and not only will you not lose your ruff, it looks exactly like the portraits, and second, since the edge of the roff that lies under your chin and ears is flat, it won't be nearly as irritating as a cratridge pleated ruff, especially aftaer a long day! By the way, this style naturally cups your face like in the portraits - it's built into the pleating!
In addition, if you ever want to make the late period style of dress with the French farthingales, stomacher and standing, fan shaped, ruff - this is the ruff they used. Those bodices have a little standing collar at the back of the neck, with two little embroidered eyelets (that also should appear in all garments after c. 1575 IIRC). The eyelets match up to two eyelets in the neck band of your ruff, and a point (your ruff point) goes through the two sets of eyelets and ties in a bow on the back of your neck (about level with your shoulders). This securely fastens the back of the ruff in place, the front is pinned into the neckline of your gown.
Well, let me see if I can adequately explain this in words. You need the same basic materials in the same amounts as you would to make a cartridige pleated ruff - I use between 8 and 12 yards for the ruff, depending on how wide I want the open end to be. Make your neckband, but leave the upper edge open all the way accross. Get LOTS of pins handy! ;-) On your prepared ruff fabric (prepared means you've already sewn on your lace, embroidered it, or whatever) mark the center back and both center sides. Mark the same points on your neckband. To pleat: take one edge of your fabric and make a small fold (about 1/2'"-1" depending on the lace on your edge and your preferences), turn the fabric over and make another fold exactly the same size in the other direction, continue to do this until you have a little stack of 5-10 even folds, one on top of the other, with the last fold facing the unused fabric. ( the more folds you have in a stack, the wider the open edge will be) Pin the stack securely. Take the unused fabric and make another stack, this time going in the opposite direction, but with the same number of folds and the same size of folds. You should end up with a flat spot on the top of your two stacks that is the width of two folds. When your second stack is done, pin it and start a third. Each time you start a new stack you should have that flat spot. It should look something like this:
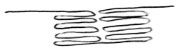
 I hope that came out, but just in case, take another look at those unstarched
ruffs - I think you'll see what I'm talking about. If you want to make a
ruff that looks like those (there are some that are two layers, one complete
set of pleats on top of another complete set of pleats) you just have to sew
your pleates ruff into the open end of the neckband. If you want a ruff that
forms O's or 8's you have another step to go. You may find it easier to
proceed if you baste in your pleats at this point.
I hope that came out, but just in case, take another look at those unstarched
ruffs - I think you'll see what I'm talking about. If you want to make a
ruff that looks like those (there are some that are two layers, one complete
set of pleats on top of another complete set of pleats) you just have to sew
your pleates ruff into the open end of the neckband. If you want a ruff that
forms O's or 8's you have another step to go. You may find it easier to
proceed if you baste in your pleats at this point.
Now, look at your pleated ruff. Starting at the left edge (or right if you are a lefty) find the first long flat point. On it's right side there will be a "break" where the flat section is underneath the ruff, and on the other side of the break is another flat section on top. Take the left half of the second flat section and pin it on top of the right half of the first flat section. Continue down the length of your ruff. Sew the pleats into place. Sew into the open end of your neckband.
You can pull the open end open and wear as is, you can starch it ( I use Argo Gloss Starch in the blue box - boil your starch, then dip in the entire ruff, put it on a form to dry (if you are making a closed (meets in front) ruff, a full 2 liter bottle or whatever approximates your neck will do, stuff the open end with balls of plastic wrap, waxed paper or whatever and let dry. Spray stiffeners from the craft store will also work, and I use those for touch ups at events - look for the ones that dry in minutes.). You can sew the 0's or 8's in place once the ruff is stiffened, and add pearls or spangles if you like.
1) Find the widest twill tape you can, drapery store or local fabric store if you are lucky. I found 2 inch wide white and cream colored twill tape at Hancock's in the belt section. It was .69/yd. I asked the recipient what their neck measurement was and they decided that a band of about an inch would be wide enough for them (I was making two).
2) I found that 5 yards made about 10 inches of ruff. I made my dots on the top and the bottom of the band about 2 mm apart and dots about 1.75 inches apart on the top and the bottom of the twill. I started stitching the twill onto the band with out doing the gathers first.
3) I tried just stitching one side as was suggested by one of our readers here but found that the movement that they were going through was giving the ruff too much of a bounce. Has to be a characteristic of the twill not the method. I am sure that for the one that Drea made stitching on one side would have done just great! I finished the stitching to the bottom edge.
4) I then added the ties to the inside of the neck band and was done. I did not have time for the lace or pretty stuff that I usually like to do.
The twill held it's shape beautifully and evenly. It lent itself to the curves and looked fuller when the ladies put them on. It was wonderful. As soon as I walked onto the site with them immediately several individuals came to me asking if I was selling them. When I told them that they were not period in material they were surprised and had to touch the twill to believe they were not stiff. They then asked how much to make them one. Sigh. I do not make stuff for fundage so I did not know how to answer.
They still look great and the guru told me that it is the sturdiest ruff he has to date, he has thrown it in the washer several times and still it holds it's shape.