Once you have a Bodice Pattern, you can use it to make up a beautifully period Gathered Kirtle. This kirtle can be made of linen or wool, if you want to be authentic, or a linen or woolen look-alike fabric if you don't want to use (or can't afford to use) the real thing.
You should have two pattern pieces made using these Bodice Pattern Instructions: A front piece and a back piece.
1.Take the fabric of your choice. Fold it, place the back piece with the center back on the fold, and trace around it. Cut the fabric out 1/2 an inch outside of the tracing lines. Once you've unfolded the fabric, flip your pattern piece over and trace around it on the unmarked half of the fabric.
2.Now take the front piece. Place it on folded fabric, with the center front against the fold. Trace around the pattern, and cut it out 1/2 an inch away from the tracing lines. Unfold the fabric, flip your pattern over, and trace around it on the other unmarked half of the front.
3.Repeat the above with your lining fabric.
4.Sew the front and back pieces of the lining together along the right back side seam, sewing along the tracing lines. Now sew the front and back pieces of the outer fabric together along the left back seam.
5.Place the lining and outer fabric right sides together. Pin them all the way around, making sure that the fabric and lining lie smooth, with no wrinkles. Fold the tips of the shoulder straps back on either side to the tracing line, and pin them down. If you pin perpendicularly to the edge, you can sew over the pins (carefully) which will make it easier to sew.
6.Starting at the side back opening, sew up the side seam and around the armscye, following the tracing lines, leaving the top of the strap unsewn Continue sewing down the other side of the strap and around the back neck opening to the top of the other back strap. Sew from the other side of this strap around the armhole and up the front strap, around the front neckline, and down the other armhole and side back opening seam.Leave the bottom of the kirtle unsewn.
7.Now make snips every couple of inches along the armscye, and in the front corners where the straps come up from the top of the bodice. Make a few snips along the back neckline of the bodice, as well. This will keep the fabric from puckering when the kirtle is turned right side out.
8.Take the pins out, and turn the bodice right side out. Iron it so that it lays flat and smooth. Hand-stitch the straps together, stitching the outer fabric together and the lining as well.
9.If you want boning along the back side opening of the kirtle-something I recommend-sew a seam, either with a machine or by hand, 3/8 of an inch away from the back side opening on the front and back. Take poly boning, obtainable at the local fabric store, and remove it from its paper or fabric casing; slip it into the channel between the seam and the edge of the fabric. You want about an inch of space between the end of the plastic bone and the bottom edge of your kirtle bodice.
Your bodice is pretty much finished! All that's left is adding the grommets, or sewing the eyelets, on either side of the back side opening to lace it closed. Grommets are not period, but they do the job if authenticity is not an issue. I use the 00 (double-ought) brass grommets from Greenberg & hammer, which are much better quality than the Dritz grommets at the local fabric store. They're also cheaper--$6.00 for 144 of them. You can stitch over the grommets with thread to disguise them.
If you want to make period eyelets, make a hole in the fabric with an awl or similar tool, stretch it to the size you want, and do a buttonhole stitch around the hole. If you use quilting thread and go 3 times around the eyelet, you can get a very sturdy lacing hole indeed! These eyelets do not tear loose, as grommets can do when placed under strain. I have worn a kirtle with hand-stitched eyelets for two years, and they look as good as the day they were sewn.
Whichever you choose, place the eyelets 1.25 to 1.5 inches apart on either side of the kirtle opening.
These kirtles and all other gowns of the 16th century were laced up using one lace. Tie this lace around the top two holes in the kirtle, tying them together. Then thread the lace alternately through the front and back eyelets, forming a zig-zag. Not only is this method period, but it makes it possible to get into a back-laced kirtle by oneself; simply lace the kirtle loosely with a very long lace, slip it over your head, and pull the lace tight. Loop it around the bottom lace and tie off with a half-hitch, weaver's knot, or whatever works for you.
Once your kirtle is laced on, measure from the bottom edge of the kirtle to where you want the bottom of the skirt to be. Make this measurement at the center front, side, and back. It should be almost the same, as the kirtle bodice has a waist that goes pretty much straight across.
Add one inch to these measurements; that is the length you will have to cut out for your skirt. The kirtle skirt is a very wide tube, gathered into the waist of the bodice. For the width of your skirt, measure around your waist and multiply this measurement by three.
To make your skirt, follow the directions for Making an Elizabethan Petticoat-for that's really what this skirt is-- up to step six. Instead of sewing it to a waistband, however, sew it to the bodice of your kirtle. Place the right side of the kirtle bodice and the right side of the skirt together, and sew along the kirtle waist 1/2 an inch away from the edge. Do not sew the lining-only the outer fabric. You may have to hand-stitch the ends of the skirt over the boned channels on the edges of the back side opening.
Once the skirt has been sewn to the bodice, iron the seam flat-with the fabric going upwards-and trim to about 1/4 an inch away from the seam. I recommend sewing a second time along this seam, for security. I can't count the number of skirts which have ripped out of a waist seam because they were stepped on!
Fold up the rough edge of the bodice lining so that the folded edge matches the skirt-bodice seam, pin and/or iron, and hand-stitch the lining down.
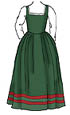
If you only did a single layer skirt, you'll have to hem it up. If you want to add a bit of pizazz to your kirtle, you can add "guards", or strips of contrasting fabric, around the bottom of the skirt. This was a very common practice of the time, particularly in Germany. One, two or three bands, narrow or wide, were stitched down around the bottom of the skirt. This can help add body to a skirt as well.
You now have a completely finished, authentically cut gathered kirtle, or "petticoat bodies", whichever you prefer to call it. This is a basic item, but very versatile; I have worn it, in lieu of a corset and separate petticoat skirt, underneath everything from a late Tudor gown to a late elizabethan skirt & jacket. Now that you have the pattern and have made a kirtle like this, you can play around with it. create a new pattern with a lower point on the front of the bodice, use brocade instead of linen, make sleeves that lace on to the kirtle straps and wings to cover the join, and you have yourself a beautiful gown.