
Not much is known about 16th century Flemish dress, and it is therefore rarely seen at re-enactments. This is unfortunate, as it is one of the most colorful, comfortable and comely styles around.
Flemish dress is composed of a number of separate pieces, which can be mixed and matched to suit the weather or your taste. The kirtle, gown, and sleeves can be any color combination you wish, and you can also choose a color for the gown lacing ribbon that will contrast with the kirtle. Colors commonly found in paintings of lower-class Flemish women include olive green, brown, medium blue, rust, tan, cream, gold, golden-orange, a warm brick red, sage green, mulberry, and coral pink.
A detailed analysis and interpretation of the items of clothing involved in Flemish women's dress is given in my paper Working Womens' Dress in 16th century Flanders (which also contains several pictures of Flemish Dress), and will not be entered into here. This is a purely practical article on how to make an ensemble which looks, feels, and hopefully moves like those worn by 16th century Flemish marketwomen, servants and kitchenworkers.
This page is excerpted from my book, The Well-Dress'd Peasant: 16th Century Workingwoman's Dress.
Materials
The smock should be made out of linen to be authentic-- either a rough linen-look blend or, if you can afford it, handkerchief linen. Nothing looks like the real thing, plus linen is cooler and wears better than cotton. If you can't afford linen, choose a cotton that looks as much like linen as possible. All of the smocks shown in pictures of Flemish women were white.
Patterns
You can create a custom-fitted smock with the Smock Pattern Generator, and use these Instructions on making a smock. Or you may choose to make one yourself out of an old T-Tunic or from a smock pattern, if you are lucky enough to have one. Make the body of the smock relatively close-fitting. If you want added support, make the torso of the smock very close-fitting, so that you have to wiggle into it. The length can be anywhere from knee length down to ankle, although mid-calf is the most convenient. The sleeves need not taper very much.
Decoration:I did see one instance of a smock's neckline being embroidered with a simple blackwork band. Blackwork, or holbein stitch in red or blue, would be an authentic form of decoration if you wished to embroider your smock. More information on Elizabethan smocks in general can be found at the Elizabethan Smock Page.
Materials
Kirtles can be made of linen or wool. I make mine out of linen, as it's easier to wash and cooler. Heavy linen stretches less and supports more than does wool. Choose a substantial weight of linen for your kirtle; handkerchief-weight linen is too light. The linen sold at fabricclub.com, for $6.50 a yard, is perfect-heavy, smooth, and a beautiful drape once washed. The kirtle bodice lining should be a substantial fabric--a heavy linen for the authenticity minded, or the more easily obtained cotton poplin, duck or drill. I recommend using a white, cream or natural colored fabric for the lining, as it won't stain your smock if you get wet and sweaty and happen to be wearing a fabric that bleeds dye color.
You have two choices here: an A-line kirtle (close-fitting to the torso, and flaring out into a bell-shaped skirt) or you can make a gathered kirtle (close-fitting bodice, and a skirt gathered to the waist).
 A Gathered Kirtle is the easiest to make, plus it can be worn over a bumroll if you want to re-use it for English or other Elizabethan wear). It is also an easier pattern to make, being a cylindrical skirt attached to a two-piece bodice. It can double as a "petticoat bodies", or a combination petticoat/support bodice, which can be worn underneath Elizabethan gowns. If you want a lot of support, you can sew 4 spring steel bones into the lining of the bodice, and wear it in lieu of a corset. I've done this, and it's much more comfortable than a boned corset underneath everything else.
You can use this Gathered Kirtle Pattern to make a kirtle bodice that fits you perfectly, and follow these instructions for Constructing a Gathered Kirtle to make one of your own.
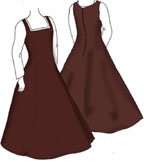 The A-line kirtle is slightly more comfortable, as it hugs the body down to the hips rather than stopping at the waist. It offers enough support up to a DD, though it doesn't flatten things out as much as a gathered kirtle if you're large-busted. It is also a more complicated pattern. On the bright side, once you have the pattern, this kirtle can be worn under Elizabethan gowns and over hoopskirts with a forepart & sleeves attached. It cannot, however, be worn over a bumroll.
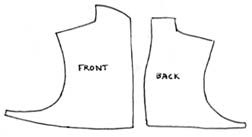
The A-line kirtle I wear beneath my flemish gown is based roughly on Arnold's loose kirtle in Patterns of Fashion Rather than hanging loose from the shoulders, however, it is fitted to the waist and flares out from there. I guessed, somewhat, on the placement of the seams, following as much as possible the seam placement on the loose kirtle in patterns of fashion. This A-line kirtle has five pieces: a center front, two side fronts, and two back pieces. It laces up the back, has a square neckline, and is sleeveless. You can look at Instructions for Drafting a Gored Kirtle Pattern.
The A-line kirtle should be cut with no curve at all to the front side seams; I made the pattern for mine while wearing a corset, fitting it as though it were going to be worn over a corset. When worn by itself, this does a marvellous job of flattening and supporting the bust, helping to achieve the look you want.
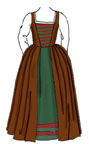
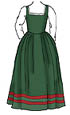
This gown gives the whole ensemble we're creating its "look". The Flemish gown consisted of a skirt gathered to a close-fitting bodice with front edges which ended some ways away from the center middle. It was held closed over the kirtle by a lace which zig-zagged through rings on either side of the front edges. The neckline of the gown could echo that of the kirtle and be high and square, or could scoop down in the front lower than the kirtle neckline by a good few inches. This gown could either be sleeveless, or have small, capped sleeves; both varieties were extant in the 1560s. The armscyes appear to have been curved, although one example of a square-bottomed armscye has been found.
The skirt was a large rectangle of fabric-or perhaps slightly flared sections-which were pleated to the waistband. Rolled pleats, also called stacked pleats are the closest I've come to duplicating the look of the skirts; knife pleats, box pleats and cartridge pleats all look nice, but don't look exactly the same as the pictures (check out An Introduction to Pleats for diagrams and pictures of all of these kinds of pleating). This skirt was lined, often with a contrasting fabric. Sometimes the skirt went all the way around, bridging the gap between the two front sides of the bodice; sometimes it was open in the front, like the bodice. The skirt and bodice of a flemish gown were always connected, and always made of the same fabric.
Materials
The gowns I studied in Flemish paintings looked to be made of wool, every one of them. Wool is by far the best choice for a Flemish gown, if you want it to look, feel and move correctly. There is little evidence of linen gowns being worn, although a wool-linen blend is a possibility; such fabrics did exist at that time, and were worn for outerwear. Unfortunately, wool-linen blend fabrics are now virtually impossible to find.
Silk-wool blends were also period, but this style of gown is almost always shown worn by marketwomen, servants, cooks, and others of similar station. Therefore, silk-wool is out of the question if your goal is to make an authentic "peasant" gown.
As wool is expensive, and as a minimum of 5 yards is necessary for this gown, an acrylic-wool blend or "fake wool" is a cheaper alternative. "Roma wool" in the fabric stores is OK. It doesn't have quite the sheen of fine wool, but is often the only affordable choice.
Pattern
Take the bodice pattern that you used to make your kirtle. Lay the front piece on a piece of paper, trace around it, and lift the original pattern piece away. Line up the back pattern piece with the front along the side back seam, trace around it, and lift it away.
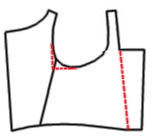 On this new pattern piece, start at the inner corner of the front square neckline, and draw a line that follows the line of the shoulder strap all the way down to the waist, as pictured to the right. Draw a line at the level of the bottom of the armhole back towards the side back seam, and draw a line down from the back armhole down to the side back seam. This creates a "squared" armhole at the back. And that's it! This is basically the gown pattern. Cut this new pattern out, cut along the back side seam, and you're ready to go. You now have your flemish gown bodice pattern.
In an attempt to make this gown as authentic in cut as possible, I incorporated some of the construction methods used in the Shinrone Gown. One of these was a squared armscye. (An example of this squared back armscye can be seen in one Flemish picture of the 1560s, and is also incidentally an indication that a back side seam was used on the flemish gown.)
Making the gown
This gown bodice will have three pieces: one back, and two front pieces. Lining is optional. The shinrone gown was partially lined with wool; it is a rather complex lining process, involving extending the bodice pattern down and folding the excess fabric up on the inside. I tried it, and it made quite a respectable gown bodice. If you wish to try a similar method, there is a full description of it at the Shinrone Gown site.
For simplicity's sake here, we will fully line the bodice the same way that we lined the kirtle.
1.Fold your outer fabric, and place the back center of the back piece on the fold. Trace around the pattern piece. Cut out the fabric 1/2 an inch outside the tracing lines, unfold the fabric, and draw the pattern lines in on the unmarked half of the back.
2.Place the front section of the pattern on a piece of your fabric. Trace around it, and cut out the fabric 1/2 an inch outside the tracing lines. Flip the pattern over, place it on the fabric, and repeat. When you finish, you should have two front pieces and one back piece.
3.Repeat the above steps with your lining fabric. You can use wool or linen, whichever you choose; a woolen lining will stretch more. This is OK--as your kirtle is doing most of the supporting, the gown bodice does not need to be exceptionally stiff. A medium weight linen or wool, or cotton if authenticity is not an issue, is acceptable as a lining.
4.Match a front piece of the gown with one of the back seams, right sides together. Starting at the waist, sew the two pieces together along the tracing lines until the front piece ends. Do the same with the other front piece. Now repeat this process with the lining. Iron the seams flat.
5.Place the lining and outer fabric right sides together. Pin them all the way around, making sure that the fabric and lining lie smooth, with no wrinkles. Fold the tips of the shoulder straps back on either side to the tracing line, and pin them down. If you pin perpendicularly to the edge, you can sew over the pins (carefully) which will make it easier to sew.
6.Sew around the edges of the bodice as you did the kirtle, sewing along the tracing lines, leaving the tops of all four straps unsewn (but sewing all the way to the edge, over the folded-back edges of the straps. ) Sew the bottom of the bodice as well. However, leave the bottom seven inches of each front side unsewn.
7.Now make snips every couple of inches along the armscyes. Make a few snips along the back neckline of the bodice, as well. This will keep the fabric from puckering when the kirtle is turned right side out.
8.Take the pins out, and turn the bodice right side out. Iron it so that it lays flat and smooth. Turn in the raw edges of the outer fabric and the lining on either side of the front opening, and iron it so that there is a smooth line from the top of the shoulder strap down to the waist. Hand-stitch the straps together, stitching the outer fabric together and the lining as well.
9.Take a 7 inch piece of boning. Poly boning is adequate, as is 1/4 inch spring steel. If you want to be exceptionally authentic, use a small bundle of broomstraw with string wrapped around it to keep it together. Tuck this boning inside the fold of the lining along the bottom front edge, and stitch the raw edge of the lining down over with a running stitch. Stitch the outer fabric and the lining fabric together along the front edge with a blind-stitch or other non-obvious stitch. You now have an invisibly boned front edge. Repeat this process on the other side of the front opening..
This boning is not essential; some of the Flemish paintings of the time show gowns which look like their front edges were boned, while others show gowns which were clearly unboned. I bone my gown edges because it gives me a cleaner, straighter, more portraitesque front edge. If you don't want to bone your gown, simply stitch the lining and outer fabric together without inserting the bone into the lining first.
10. You can use metal rings or normal, small eyelets from the fabric store to lace the gown closed. I prefer the large, flat-topped hooks & eyes from Greenberg & Hammer. The flat top lets a wider lace through the eye without it gathering or twisting, and lets the eye be placed closer to the edge of the fabric. They are also considerably larger and more substantial than the hooks and eyes one finds at most fabric stores. Contact info for Greenberg & Hammer is on the Mailorder Resources page.
Sew these eyes to the lining of the gown, on either side of the front. Try to sew them only to the lining, not letting the needle catch the outer fabric of the gown. Stagger the hooks so that, when a lace is laced through them, it will zig-zag up. Sew one eye to the very bottom of the front opening, and every other eye an inch above the last; on the other side, sew the first eye 1/2 an inch from the bottom, and every eye an inch above the other.
You can have the gown lace up as high as you wish. It can have as little as 6 inches of lacing, or alternately, lace all the way to the top of the kirtle. Both are equally common in paintings.
Your bodice is done! You can wear it over a gathered kirtle without a skirt attached, if you like; not absolutely authentic, but it looks very spiff nonetheless.
The skirts in 16th century genre paintings were lined-all those where the lining could be seen, that is. The lining was often a contrasting fabric, and was very likely wool rather than linen.
Whether or not you want to line your skirt is up to you. It does make the skirt heavier and bulkier at the waist, but gives it a more substantial hang and lets you pin it up in one of the many fashionable ways that Flemish women used. If you do line it, choose a color which contrasts with your gown fabric for some extra flash. I've used both linen and wool for lining; both work equally well.
Measure the waist edge of the bodice; this will be the finished length of your pleated skirt. If you want to use knife or box pleats, you will need three times this measurement to get enough fabric. If you want to use rolled pleats, however, you will need 5 times the measurement for enough fabric. Although they take more fabric than other types of pleating, I highly recommend rolled pleats; they are the only type of pleating I've found which accurately imitates the look of the pleats found in the portraits. Other pleats aren't bulky or deep enough, although they were used in period.
Measure the waist-to-ground measurement for your gown skirt just as you did for your kirtle skirt, with one inch added to the original measurement. This is the height of the fabric you will need. Do the same for the lining. Lay the skirt fabric and lining right sides together, and sew the long bottom and the two shorter sides together 1/2 an inch away from the edge. Turn it right side out , and iron flat. Turn the edges of the open side in 1/2 an inch, and iron. From this point on, regard the lining and outer fabric as one layer.
Pleat the skirt using the pleating method of your choice. Rolled pleats, as they are too thick to pin, may be basted with a running stitch. Check out An Introduction to Pleats for a survey of the kind of pleats you can use. Place the right side of the bodice and the skirt top together, and, using a strong thread (silk if possible) stitch the top of the skirt and the bottom of the bodice together. As the skirt is basically finished on top and the bodice is finished on the waistline as well, this will make the join even stronger.
And now you have it! smock, kirtle and gown. Try it on, and you'll be amazed at how cool it looks.
 Partlets were worn by all Flemish working women, it seems; there are few pictures showing a woman without one during the 1550s to 1570s. They are very easy to make, very versatile (the same partlet can be worn with a 1530s Tudor gown), and invaluable in reducing bodice-burn after long periods of time outdoors.
Partlets were made of white linen or of black wool. The woolen partlets were worn for warmth, and were sometimes worn in conjunction with the lighter linen partlet.
Patterns
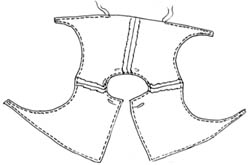
This partlet pattern shown below is the one I use. It makes a flared-collar partlet which looks similar to the one shown above.
Jean Hunniset has some wonderful partlet patterns in her book Period Costume for Stage and Screen.
Making the Partlet
To make a linen partlet, trace around the pattern pieces you have and cut them out 1/2 an inch outside the traced lines. You will need four front partlet pieces and four back pieces (these will make up both the outer layer and the lining, which are identical.)
First, sew the back pieces together. Iron the center back seam. Do this again for the lining.
Now sew the two front pieces to the back piece along the shoulder seams. Do this to the lining as well.


Place the outer fabric and lining together, pin, and sew around the edges all the way around save for the center back bottom.
On all curves, clip the seam allowance carefully to just outside the seam line. It is important to do this--otherwise the partlet won't lay flat.
Turn your partlet right side out, iron it flat, and it is pretty much finished. Pin the underarm pieces together and try it on; once you know where the underarm pieces should meet, mark this point, cut off the excess, turn inside and finish. Use buttons & loops or hooks & eyes to fasten them together.
You can fasten the front together at the bottom with a pin, with a button & loop, or with a hook and eye combination. If this is a linen partlet, use spray starch while ironing to make the collar slightly stiff. Stitching heavy fishing line into the front center seam also helps the linen partlet to curve back without wilting down (though, as period pictures testify, wilting often occurred.)
An apron can also be worn if you wish. Aprons were white, olive green, pink, brown, blue, and a variety of other colors. I recommend linen, as it's far more washable.
Aprons were exceedingly simple items: simply take a rectangle of fabric about 2/3 of your waist measurement wide and long enough to reach to mid-calf, tie some strings onto the ends, and tie it over your skirts. It will squish the skirts together at the hips, and help keep kirtle and gown in place.
 The basic headwear of choice appears to have been a caul, a circle of fabric-white linen in most pictures-gathered to a band and fixed to the head. Over this could be worn a Flemish hood, with a wired front, or a straw hat.
You can use these instructions for Constructing a caul to make one similar to the caul worn to the right.
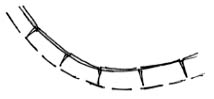
 Straw hats could be worn over a caul by peasants and marketwomen to keep the sun off. They weren't considered very "fashionable", but nevertheless came in a variety of shapes. Some, like the one shown to the left, were wide-brimmed with a narrow crown; some had a flat-topped crown, while some were bowl-shaped. You can find good straw hats for Flemish 16th century dress from purveyors of late 18th century dress, surprisingly enough. When fastened to the caul with a hatpin, this straw hat will stay securely on even in gusty weather.
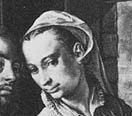 In the late 1560s and 1570s, the flemish hood became popular as a fashionable accessory to wear over one's caul. It was simply a rectangle of fabric wired along the front edge, with the two sides pinned together at the base of the neck and the rest draping gracefully down the back.
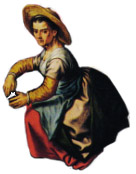
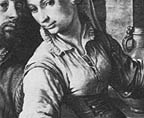
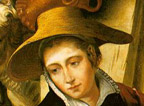
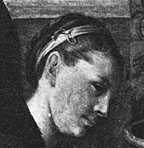 If you have long hair and don't want to fuss with making headwear, you could go the alternate route-several Flemish marketwomen wore no headwear at all, but rather gathered their hair at the nape of the neck, tied firmly with a ribbon, and then wound that ribbon spiral-wise down to the end of their hair. They then made a coil of this length of hair around the back of their head. A band of fabric wound around the head was used in conjunction with pins to keep the coil in place; a very large bobby-pin could be slipped over or through the band of fabric and the coil of hair, as the picture to the left demonstrates. Alternately, small lengths of free hair were drawn over the coil and pinned in place.
Check out pictures of Outfits Made from these directions .