Once you have a corset pattern, you can easily alter it to make a bodice suitable for most of the 16th century. This bodice can be worn over your bodice, or it can be worn without a corset underneath to create an "Elizabethan" silhouette appropriate to middle or lower class women.
I based this pattern somewhat on the pattern of the petticoat bodies of Eleanora of Toledo, shown in Janet Arnold's book Patterns of Fashion: The Cut and Construction of Men and Womens dress 1560-1620.
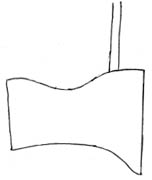
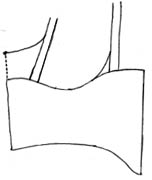
| To begin with, take the corset pattern you have created. If you have already made a corset from this pattern and altered it so that it fits you precisely, so much the better. Measure out four inches from the center front, and draw a vertical line up several inches (8 or so.) If you have already made a corset from this pattern, put it on and measure the distance between the front top of the corset and the top of your shoulder and make the strap this long. Draw another vertical line 1.5 inches to the left of this line; this will be the front "strap" of your bodice. |
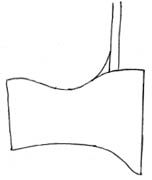 | Draw a curving line connecting the side edge of the strap to the top of your corset. |
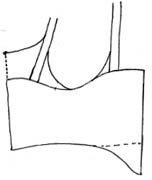
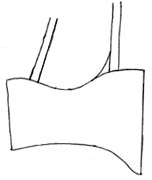 | Now, starting about three inches to the right of the center back of the corset, draw a line slanting up and to the right about 10 inches long. If you have already made a corset from this pattern, put it on and measure the distance between the top back of the corset and the top of your shoulder and make the strap this long. Draw another one 1.5 inches to the right of the first line; this is your back shoulder strap. |
 | Extend the center back line of the corset up four inches. |
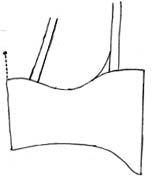
 | Connect this extended back line with the top of your back strap, as the diagram to the left illustrates. |
 | As you did for the front strap, draw a curving line connecting the side edge of the back strap to the top of your corset. This will create the armhole of your bodice. |
 | Eliminate the front point of the bodice, if you so wish, or modify it to a gentler curve. |
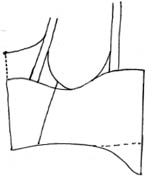 | Draw a diagonal line from the center of the back side of your armhole to the bottom of the pattern, about 4 inches away from the center back. |
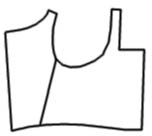 | Once you've cleaned up all the drafting lines, your bodice pattern will look somewhat like the picture to the left. Cut along the diagonal line to make this a two-piece kirtle pattern. And that's it! |
Fitting can be quite complicated, but this pattern is very simple and even if you've never fit a bodice or any other garment before, you can get a quite respectably fitting bodice. To do this, take a heavy fabric--canvas, poplin, drill or something similar. Place the front piece of your bodice fabric on the fold, trace around the pattern, and cut out the fabric 1/2 an inch away from the traced edge of the pattern. Then place the back piece of your pattern on another piece of folded fabric, trace around it, and cut it out half an inch outside the traced lines.
Sew the pieces together along one side back seam, and pin the shoulder straps together. Then try it on. If you have an elizabethan corset, put the corset on first and try the bodice on over it. Have a friend safety-pin the other diagonal side back seam closed. Pull the shoulder straps tight, and safety-pin them together at the top of your shoulders. (You may have to perform the "elizabethan lift" during this pinning procedure, to elevate the bosom and achieve a correct 16th century silhouette.)
Now check the following:
Now take the bodice off. Rip the back side seams apart, trim the shoulder straps to the point you marked with a pen. Cut along the pattern lines of the pattern, making all alterations specified the pen marks on the bodice--cut out the armhole a little wider, cut along the curved top back seam, trim the front neckline down a little, etc.
Lay your bodice pattern pieces on top of the original paper pattern pieces, and transfer all alterations to the paper. Here is where you would cut shoulder straps (on the paper pattern) and move them toward or away from the center front; here also is where you would add paper to the bottom of the pattern to lengthen the waistline.
Once you have this bodice pattern, you can use it to make an Elizabethan or tudor gown . You can also place it on top of commercial Elizabethan bodice patterns, to make sure that they will fit you like they should, or use it to Make a Kirtle.