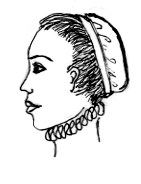
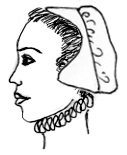
The construction of a caul is exceedingly simple--it is basically a circle of fabric gathered to a band and fixed to the back of the head. Below you can see two variations on the Elizabethan caul; one has a wider, curved band similar to the Elizabethan Coif of the time, while the other is gathered to a narrow strip and sits far back on the head. The construction of these two types of cauls is quite similar. For clarity's sake in this article, the caul to the left will be termed a "caul", while the caul to the right will be termed a "Muffin Cap". Click on the image for instructions on creating it.
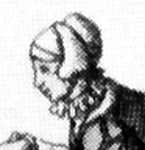
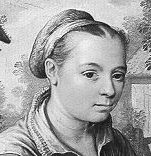 You can make your caul out of pretty much anything. Fancy cauls can be made out of satin, velvet, taffeta, fine silk or brocade; plain cauls can be made of linen (or cotton, if linen isn't available). If made of linen, the fabric would almost certainly be white. To the right is a picture of a Flemish marketwomanwearing a simple linen caul, similar to the one which the instructions below will produce.
Pattern
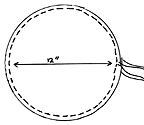
 A caul doesn't really have a pattern; it is simply a circle of fabric 10 to 12
inches in diameter, and a strip of fabric or fancy trim around 19-21 inches
long and 3 inches wide. (The length of the strip length depends on your head size; you want a strip long enough to go
around your head plus an inch extra.) If you are using a fabric strip, cut it on the bias. This will allow the
outer edge of the band to stretch and fit your head better.
A caul doesn't really have a pattern; it is simply a circle of fabric 10 to 12
inches in diameter, and a strip of fabric or fancy trim around 19-21 inches
long and 3 inches wide. (The length of the strip length depends on your head size; you want a strip long enough to go
around your head plus an inch extra.) If you are using a fabric strip, cut it on the bias. This will allow the
outer edge of the band to stretch and fit your head better.
An 8-inch circle products a caul without many gathers which sits to the back of the head; if you want a "puffier" caul, use a larger circle--say, 16 inches in diameter--and a longer strip which fits more towards the front of your head.
Decoration
If you are going to embroider, bead or otherwise decorate your circular
caul-piece, do so before you gather it to the band. This includes making any netting you wish to place over the caul. Cauls were decorated with lace, pearls, spangles, jewels, embroidery, couched cord,and pretty much any form of decoration applied to other items of Elizabethan clothing.
Sewing the Caul Together
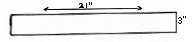
First sew a basting stich (either by machine or hand) around the outside of the cloth circle, 1/2 an inch away from the edge, and gather it until it measures 20 inches in circumference. (This is if you are using a 21 inch band of fabric; if you are using a longer or shorter band, gather the circle until it measures 1 inch less than the band. 18 inch band=17 inch circumference, 23 inch band=22 inch circumference, etc.
 Take your band, fold it in half, and iron it flat. Fold the raw edges in 1/2 an inch, and iron the band again. It should now be one inch wide, and resemble the picture shown to the right.
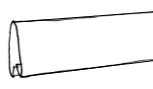
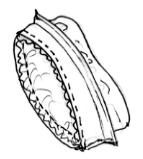 Take the ironed band, and place one of the outside creases against the outside of the gathered caul. Sew the two together along the crease. (See diagram to the left). Fold the band over, and match the other edge fold of the band up with the inside stitching on the edge of the gathered circle; whipstitch it into place. You now have a finished caul!
Wearing the Caul
 A caul fits at the back of the head, where it is held on by pins or combs.
As Elizabethan women almost always had long hair, they wrapped it into a bun or coil at the back of their head and placed the caul over it; the hair helped to keep the caul in place, aided with pins and perhaps combs.
A caul fits at the back of the head, where it is held on by pins or combs.
As Elizabethan women almost always had long hair, they wrapped it into a bun or coil at the back of their head and placed the caul over it; the hair helped to keep the caul in place, aided with pins and perhaps combs.
To the right is a picture of myself wearing the caul made according to the above instructions. To keep my caul on and my short hair neatly underneath (a tricky business), I cheat and use a stretchy plastic comb stitched to the inside of the caul band along the sides and top. As well as keeping a caul firmly in place through races and somersaults, this really helps women with short hair, wispy hair, or hair that won't stay in a bun to keep their coiffure looking neat, and keep their caul in place. Lacis sells large metal haircombs, which serve a similar purpose. Alternately, you can sew loops of thread or string to the band and use bobby pins slipped through the loops and into your hair to keep it on.
Slicking your hair back with dippity-do or some other type of hair gel before putting your caul on is yet another way to keep your hair looking neat and your caul in place. The hair-gel provides a bit of friction to help the caul (and your tresses) stay where they should.
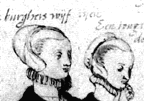 The "Muffin Cap" of renaissance faire fame is actually a caul or coif very similar to the one described above. The only difference is the band; instead of being a simple band, it is shaped into a curved edge. There are actually very few representations of this kind of cap, although it is very popular with re-enactors. It is shown worn by washerwomen (see picture to the right) and the middle class (the woman to the right in the picture to the left--a Gentlewoman's daughter), and could very well be a caul gathered to a thin band and pinned to a Wired Elizabethan Coif as well as a complete item in its own right. For re-enactment purposes, however, here are some instructions on making a muffin cap with a curved band.
Materials
As so few representations of this kind of headwear exist, it's unknown whether or not they were made out of fancy fabrics; all pictures show them made of a light-colored fabric, most likely white linen, which almost all Elizbaethan coifs were made of. A fine cotton with a good hand makes an adequate replacement; a coarser fabric for lower-class characters is good. As this cap takes so little fabric (less than 1/2 a yard), you can afford to buy good linen for it.
Pattern:
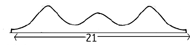 As with the caul above, the muffin cap pattern is exceedingly simple. It consists of a circle 12-16 inches in diameter (shown to the left) and a curved band to which the circle is gathered (shown to the right).
Decoration
Muffin caps were most likely undecorated, as opposed to cauls. You may embroider the band with blackwork, embroidery or some other decoration, but if authenticity is your goal, keep in mind that there is no evidence that this decoration was used. (It does look very sharp, though.)
Constructing the Muffin Cap
To make the band, cut out two bands of fabric similar in shape to the band shown above, and sew them together along the curved edge as shown below.
Clip the seam allowance, turn the band inside out, and iron it flat. Tuck the raw edges in half an inch and iron. This finishes your band.
 Now gather the circle until the circumference matches that of the band. Place one of the ironed creases in the band against the outside of the gathered circle, matching it up with the gathering stitches, and sew the band and circle together as is depicted in the "Making a Simple Caul" section. Now take the other open edge of the band, and match it up on the inside of the gathered circle with the seam already sewn; hem-stitch it down. You now have a muffin cap!
Wearing the Muffin Cap
As with the caul above, the muffin cap was usually worn far back on the head and kept in place with buns or braids of the woman's hair, aided with hairpins and perhaps combs. You can sew combs into the band to help keep it on, or use bobby-pins in conjunction with loops of thread for the same purpose. Slipping a shaped piece of millinary wire (I use 18 gauge, or even two pieces of 18 gauge millinary wire bound together) into the front curved edge of the muffin cap before you stitch the band closed can also help keep it on; a strap under the chin is another alternative, though there's no evidence that a strap was used with this kind of cap.